I HAVE BEEN WATCHING PATIENTLY FOR THE CARRY-OVER LIST FROM THE HOLIDAY MINI. WELL HERE IT IS!!!
carryover products from
stampin’up!®
Some of the fantastic products featured
in previous Stampin’ Up! catalogs are still
available! Don’t miss your chance to get
these products from your demonstrator.

Wednesday, December 28, 2011
Wednesday, December 21, 2011
Bible Journal

I made several of these Bible Journals for my Sunday School class and friends. There are enough pages for a year of sermons. Also there are sections for prayer requests and answered prayers, Scripture Verses and what they mean to me, In my thoughts, and Letters to the Lord. The cover was created with Cricut letters and designer series papers. Each one was different. I also spiral bound each book and laminated the covers.
Monday, December 19, 2011

This is a birthday card that I made for a friend who loves purple. The background is a designer series paper that is now retired that was sponged with concord crush and elegant eggplant to give it depth.
Whisper White was stamped using the Just Believe set in Lucky Limeade. Then I used the Boho Blossoms punch to punch out Concord Crush and Daffodil Delight flowers.
The tag was a 2 3/8" circle punched from Daffodil Delight. The scallop is the #2 Scalloped Circles die and the Wish Big is from Word Play(I LOVE this set for words). I added a star eyelet. The flowers have buttons and Basic Pearls.
Sunday, December 18, 2011
Easy Christmas Card
 Merry Christmas Card
Did you know that you can use the Medallion background stamp to make a wreath? Easy Peasy too!!
Just ink up the background stamp with a green, I used garden green, and wipe off the center.Then stamp on Whisper White. I punched some small circles in Real Red and stamped Happy Holidays. Added a bow from our satin real red 5/8" ribbon and layer on real red for a quick easy Christmas card. This is the most versatile background stamp Stampin' Up makes in my opinion.
Friday, December 16, 2011
Clearance Rack Blitz
Treat yourself to an early Christmas present. Remember today is the last day to order to ensure you get it by Christmas.
Monday, December 12, 2011

This technique creates an dramatic card. The intensity of the color is achieved by letting each color dry and then adding additional color to layer until you get the depth of the color you desire. This card was cased from Cathy Somody.
1. On watercolor paper, stamp the images in Versamark and sprinkle with clear embossing powder. Heat to set with a heat tool. Hair dryers do not work to heat set embossing.
Tip: Old embossing powder will not adhere well or give good results. Also it takes a little longer to heat set on watercolor paper. Heat images until they are shiny for best results.
2. Use an aqua painter which is a brush-tipped pen with water inside. To add water just squeeze the pen. To dry off the tip you can touch or wipe the tip on a paper towel.
3. Add 1-2 drops of refill ink to a palette with wells. Squeeze a drop or two of water into the well to dilute the ink. Using the brush tip, dip it in the ink and spread the ink over the images. Let dry and then add more to layer intensity of the color. To change colors, wipe the tip of the aqua painer on the paper towel until clear. Then pick up next color. Do not overlap colors unless area is dry or the colors will muddle. Allow to dry well before adhering to the card. You can dry with a heat tool if needed.
Sets: Flower Fest, Sincere Salutations
Cardstock: Rich Razzleberry, Watercolor paper, Brights patterned designer series paper
Inks: Rich Razzleberry, Daffodil Delight, Old Olive
Accessories: aqua painter, dotted scalloped edge border punch, white and clear embossing powder, heat tool, paper snips, mini glue dots, snail adhesive
Tuesday, November 29, 2011
Gift of Christmas card

This card's base is Sahara Sand that matches the Mocha Morning black flocked designer series paper that is used on this card. I LOVE Mocha Morning. If you haven't seen it in person, you are really missing out as it is absolutely gorgeous!! I also stamped the swirl in Basic Black on the base card.
The Gift of Christmas was stamped in Versamark and embossed in gold on Brushed Gold cardstock which gives it an elegance. An additional dove was embossed, cut out and popped up with Stampin' Dimensionals. On the right edge is a strip of brushed gold that one edge was scalloped with the Scallop Edge border punch. White Taffeta ribbon was stretched across and a bow was made with the Fork Technique.
A tag was stamped and embossed with gold and punched with the large oval punch and added in the lower corner. The three fake brads were made and added in the top left. I love the fake brads because they don't cost extra in postage to mail.
My Blogspot QR code
A QR code is a quick link that is used to go to a specific website. Here is a QR code for my blogspot posts so you can quickly access it with your smartphone.

Friday, November 25, 2011
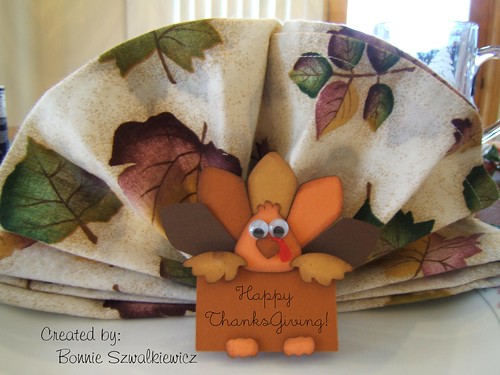
Thanksgiving Placeholder
Thanksgiving Placeholder
I am still waiting for the turkey to cook. We are having
dinner at 5:30-ish. In the mean time I was looking for a table
decoration to make and I finished it just in time.
My first step was to learn how to fold some homemade cloth napkins. I found a video on how to fold a fancy turkey fan looking fold.
Next I headed to my craft table. Using my Cricut electronic die cutting machine, a die cutting program (Make The Cut) and an SVG (scalable vector graphic) design I cut these stinkin’ cute turkey place cards. The design is by Michelle Currie at Designs on Cloud 9.
Thursday, November 24, 2011
Bells and Boughs
 | |
| Bells and Boughs |
I love the way the holly berries are three dimensional. I used the Dazzling Details and popped them up.
 | |||
| Fall Wreath with Polished Stone |
The ribbon is the 1 1/4" old olive striped grosgrain that I used markers to color the stripes. I made a bow and added a Fire Rhinestone brad.
Wednesday, November 23, 2011
Today I had so many plans to stamp after doing some cooking. Well, I was finishing making a Turtle Cheesecake and cleaning up the dishes when I put my hand in the dishwater and felt the slice of my ring finger. I pulled it out and got a paper towel to wrap to stop the bleeding.
I got a bandaid and went to find Garey. He was busy replacing a light switch so I waited for a minute or two before saying I really need some help. He stopped and hlped me secure a bandaid tightly to stop the bleeding. The blood went quickly though that one so he took some first aid tape and wrapped it. Well then my finger turned blue. OOPs, too tight!!
When he unwrapped it to loosen it so I had blood circulation, it went wild. Tha is when I decided I needed stitched. So he said he would take me, I told him he had to stay here to take the cheesecake out of the oven in 40 minutes.
I drove myself up there to the Immediate Center to get my finger stitched. It only took three stitches but the doctor agreed that I needed stitches as it was deep and wouldn't quit bleeding. After leaving,l I went to Wally World and Kohl's. Then home to finish supper since I did get a rotisserie chicken at WW.
I got a call at 6:15 pm to come back and forgot the Tetanus shot I forgot. I finally got home to crash so no stamping today. Boo Hoo. I can't get my finger wet for 24 hours. Tomoeeow I am to make 18 eggs for deviled eggs. MMMmmmm..may have to get Garey to help with peeling them. Happy Thanksgiving to all!
Tuesday, November 22, 2011
Technique: Masking
|
|||||||


Christmas Lodge

The white is actually Shimmery White with tiny sparkles in the cardstock. The inside is stamped with the tree in Always Artichoke on the right and the Merry Christmas in Bravo Burgundy overlapping the tree.
The front Shimmery White is 1 3/4" x 4" and stamped with the Happy Holidays. The pine has Dazzling Details applied to it. Both Shimmery White pieces were sponged in Always Artichoke. The AA back is 2" x 4 1/4". I used Sticky Strip to hold the front piece on the embossed image. Inside on the other side of the 2 1/4" side is an ornament stamped in Bravo Burgundy from the Delightful Decorations set and punched with the ornament punch.
Sets: Christmas Lodge, Delightful Decorations
Cardstock: Bravo Burgundy, Always Artichoke, Shimmery White
Inks: Always Artichoke, Bravo Burgundy
Accessories: Dazzling Details, Sticky Strip, Ornament Punch, sponge, Big Shot, Multi-purpose Platform, Petals-a-Plenty Textured Impressions folder
Original design by Lee Ann Greff
Subscribe to:
Posts (Atom)